Hey Friends, today I want to talk about how I learned to embroidery digitizing.
Several of you asked about how I learned to digitize so I thought I’d walk you through my learning process.
When I decided I wanted to learn how to digitize, I started out Googling the different software that is available. Many of the softwares have a 30 day free trial which is nice so you can try different ones out to see which you like best. They are all fairly similar, but maybe one will seem more intuitive to you as you play around with the different software.
At the time we were living in New Mexico and the local sewing dealers did not teach digitizing. I knew I was either going to have to teach myself or I needed to find a teacher online. Online seemed to be the way to go. I think you could easily teach yourself if you are wanting to do things such as add a name to a design. However, I wanted to learn how to fully build a design from scratch.
How much you want to do in digitizing also plays a factor in the cost. If you are wanting to add a name to your design you can purchase a less complex and an easier to use software that is also much less expensive.
In looking online, I found a lot of videos for Floriani software, Embird software and Generations software. Then I found Larry and Holly Pike teaching Generations software, where I could watch live and pay a monthly fee to have access to them and ask questions. This is what helped me decide to go with Generations. I joined Larry and Holly’s group for about a little over a year and practiced, practiced, practiced. I’m still learning today little tricks with it.
One thing I did which has been very helpful is to stitch out samples of little squares and change some of the variables on each square. I will change the density of a square, or change out the pattern of the square, or change the stitch length or underlayment. As I would stitch the squares, I would write directly on the fabric all the settings I used. That helped me to learn what I liked best. All those sample fabric squares are in a notebook.
I’d also practice the different types of stitches such a redwork, satin stitches, blanket stitch etc. I’d change the stitch length and width and again record the settings on my sample fabrics.
When I was choosing my software, on of the things is, you don’t know what you don’t know. So in looking back, one thing I would have given more consideration to is the embroidery formats that I am able to produce designs in. I cannot create ART designs which are for Bernina machines. I do think most of my Bernina friends can still stitch on their machines in some of the formats that I offer, but having designs available in ART would be nice because people do ask for that.
As I continue to learn, you will see me get on little tangents of doing one style of embroidery more than another. Right now it is doing free standing lace. I’m having so much fun with that.
Friends, I’m not affiliated with any of the embroidery software companies so if you are thinking of learning to digitize, do try out the 30 day free trials that the different companies offer and really dig in and play around with the software. Even if you don’t want to create your own designs, just having the ability to personalize your embroidery can take your machine embroidery to the next level.
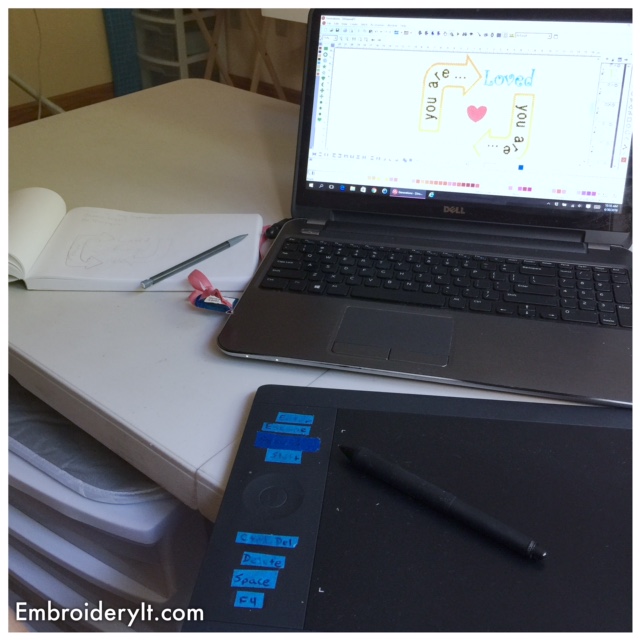
Here is a sneak peek behind the scenes of creating an Embroidery design.
Here I am in the Embroidery It studio. First I sketch my designs on my sketch pad. I always use a pencil and sometimes colored pencils.
Then I transfer the design to the computer using embroidery software. (I use Generations, but there are a number of different ones out on the market. Most have a 30 day trial so if you are looking for one, try several to see which feels the most intuitive to you) What you see in front of the computer is an electronic sketch pad or tablet and pen. I use a Wacom, but again there are several different ones out there.
All my designs are digitized by hand. I never use auto digitizing. Also, all designs at Embroidery It are my own artwork. You will not find these designs elsewhere.
After the design is digitized, I test it out on my embroidery machine. Sometimes what I think looks good in my head and on paper doesn’t always translate well to thread and fabric.
I make any computer changes to the design as is necessary and stitch the design again.
When I’m satisfied with the design I gather it in all the formats.
I also photograph the finished design.
Then I put the design in my Etsy shop and I write about it here!
And that is what goes into the making of a design.
I’m home from vacationing in beautiful Florida the past couple of weeks. I feel so blessed that we got to live there for a year and a half several years ago and made some great friendships. The weather was beautiful and I had twinges of missing living there. That said, it is sure good to be back “home” in Michigan. It is just a slower pace and way of living up here and I thrive on that. 🙂
Amongst doing loads and loads of laundry and getting caught up on e-mails, I’ve been doing a bit of digitizing and stitching and will have a fun new design for you this coming week.
What is on your embroidery hoop this morning? I’d love to hear!
One final word, I will be changing out the cross stitch letters sometime Tuesday. Be sure to grab the current letters if you haven’t already.
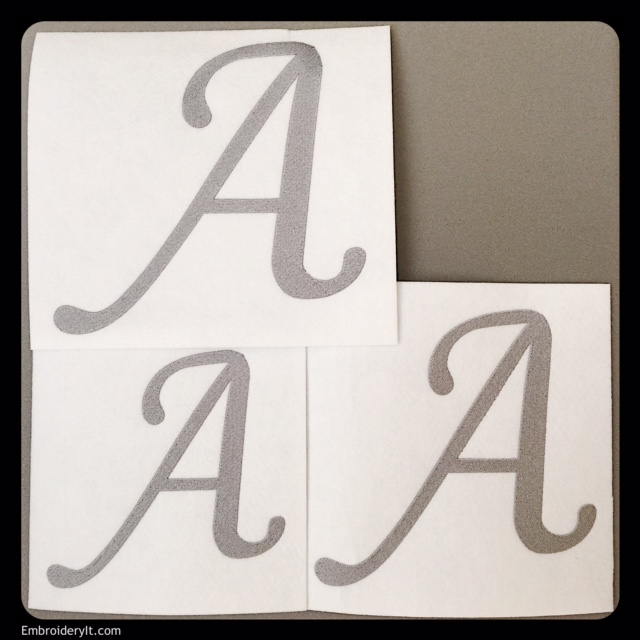
I’m happy to announce the debut of oversized machine embroidery monograms!
Now that I have a larger machine I am excited to try larger size digitizing and I’m starting with my script monograms.
Each letter is/will be offered individually in 3 sizes which require hoops larger than 5 x 7.
These oversized monograms will be perfect for items such a pillows, seat covers, grill covers, Christmas tree skirts, wall hangings and so much more.
Currently one letter is released at a time – approximately a new letter each week. As each new letter is released it will be offered for only $1.00 which will be %50 off the regular price.
Now for those of you whose hoop size is 5 x 7 or smaller, never fear. A regular size set of the same letter, again in 3 sizes is also available. As with the oversized set, this regular sized set is also offered at an introductory price of only $1.00.
These smaller sized monograms will look beautiful on items such as shirts, jackets and more!
Enjoy working with monograms friends. I’d love to hear what you enjoy stitching monograms on.
A quick note here to let you know that the Let’s Celebrate Pennant Banner B is now available at the bottom of the home page and will remain there for free for approximately 1 week when I replace it with the letter C. I have moved the letter A to my Etsy shop.
My latest designs have been inspired by out daughter Katie who as you know is currently serving in the Air Force. Katie loves horses. Actually she loves all animals and for a long time she wanted to be a veterinarian. When she finishes her time in the Air Force, which will be next May, she plans to study equine dentistry and become a horse dentist. She hopes to live on a farm where she can raise lots of animals and little critters. She has the heart of St. Francis.
Remember the “Barn Girl” jacket she asked me to embroider for her.
There are three horseshoe applique designs and they are sold individually. There is a small single horseshoe which fits the 4 x 4 hoop, a large single horseshoe for the 5 x 7 hoop, and a double horseshoe which fits the 5 x 7 hoop.
The final stitching of the design is the nails in the horseshoe. These may be eliminated and you may replace them with rhinestones or sequins for an added touch. A bow also adds a bit of fun.
I’ve been having so much fun with my Rick Rack Alphabet! My embroidery machine has been busy. As the snow melts I’m certainly looking forward to warmer weather. I also wanted to create a banner for my eat in kitchen area. I will be putting the banner up very soon!
Can’t you just tell I’m dreaming that the thermometer will soon rise 🙂
Then I’ve always had in the back of my mind spelling out “Merry Christmas” with the Rick Rack Alphabet and using silver rick rack. I got started with the letter M this past week. Along with the yo-yo looking like a flower, it certainly looks like a lollypop so I’m going with the candy theme here. The little embellishments are from “Dress It Up.”
Finally, more requests have been coming in asking for the remaining Rick Rack Alphabet letters. I don’t have them all completed but here is what I am going to do. The letters will still be free, one each week, but as I complete other letters further down the alphabet, I will have them in my Etsy store. This way if you don’t want to wait for them to be free, you have the option of grabbing them sooner. I won’t promise when the additional letters will be available, so be sure to pick in from time to time.
Hugs to each of you.
Remember…Be creative daily and live life beautifully.
Humming the tune of “Rawhide” in my head. Sewing, Sewing, Sewing, the bias tape keeps growing, da da da da de da Rawhide!
I’m sewing the bias tape on the 20 boy scout neckerchiefs. Each neckerchief takes a full package, 4 yards. That’s 80 yards I’m stitching on. I’m on my 6th neckerchief right now. Just needed a break!
Have you seen a presser foot like this? It is a “binding foot” and it hold the bias tape open and in place and the fabric fits in a little slot that feeds it right down the middle of the tape. Sure makes it easier to sew as there is no pinning required and it catches the bias tape neatly on both sides.
So I keep plugging away singing my little diddy. Actually, I’m listening to podcasts as I sew. Have you ever heard of Daily Audio Bible or Merry Ministries? Those are two great ones to listen to, and they are free!
Hugs and blessings,
Nancy
ps. Want to know a little secret? I have produced some podcasts myself. Back in 2010 I made several podcasts that you can find on iTunes. My podcast was titled “Making Our Home a Haven.” In my very own home, I have always strived to make it a haven. I don’t always succeed, but I do always strive for it. 🙂
Whew, the neckerchief design for the boy scouts is done! This is my second digitizing design I’ve completed and I’m thrilled at the results. Remember what it started out looking like below? It is a map of the hiking trek that the boys will be taking this summer at the Philmont National Scout Ranch.
More was added in the detail and we went to three colors. I’m making the neckerchiefs as well. I’ve used broadcloth to stitch them on. The stabilizer is Floriani’s fusible wash away. It certainly makes for a smooth surface to stitch on. For the final step I’m stitching on 1/4″ bias tape. That’s what gives it the nice candy stripe effect as the neckerchief twists up at the ends.
Here is my son Timothy, our youngest. He is such a character and was goofing off for the camera below. He really has a great sense of humor and loves to tease his sisters, and his parents too! I’m very proud of him and all he does in boy scouts. He is a good young man. Timothy is a Life scout and will become an Eagle scout this summer. He and Mike have been involved in scouting since Tim was six years old. He will turn 16 in July. Golly I’m feeling old. My babies are all growing up!
Now I’m working on making 20 of these neckerchiefs for everyone. It’s keeping me busy for a few days!
Anyone want to hike 71 miles up, down and around a couple mountains? 🙂
Hi Friends,
Doing the happy dance because I created a design!!!
My son’s boy scout troop has asked me to create their neckerchiefs for their upcoming camping trip to Philmont. The line with dots indicates their hiking trail and stops. This is the practice stitch out which I did on heavy craft weight stabilizer. That stuff doesn’t iron out, but at least they can see the finished design.
I’m so super excited about doing this! I did it!!!
I used my Generations software and my Intuos graphing tablet. It has been fun a fun couple of days. I can’t wait to show you the finished neckerchief.
I wish you hugs and blessings and happy embroidering,
Nancy
This has been a busy week following Easter. Even so, I finished sewing names on cheer skirts and gym bags for a team. They asked me to specifically sew over the pleats which I was very hesitant to do. That is what they wanted. Needless to say, when the girls have them on, the skirt flairs out so my concerns were aleviated and all looked well.
This is our beagle, Cindy. I set up a folding table in Katie’s old room to have extra room for doing the skirts. Cindy follows me everywhere, so as I worked, she was right there with me in the room, shoring soundly! She too, was tired from a busy week 🙂 I do have to say, the bed she’s on had been made, but that little ornery girl pushes all the covers off to the side and makes a mess of them and the pillows. Funny girl 🙂
With the money I’ve made doing embroidery, I splurged on this that I have been wanting for a long time! It is a medium Wacom Intuos 5. I’ve never used a graphics tablet before, but as I learn to digitize embroidery, I’ve felt this will be a huge time saver and it has been recommended by many to me. Our son’s boy scout troop wants me to design their neckerchiefs for their big camping trip this summer. That set me over the top in “needing” one.
I did it! I created my very first manually digitized embroidery design! I’m doing the happy dance here. Never mind the fact that it is a simple design, and I did have issues that I now know how to resolve, I still did it! I finally jumped into the water.
I used my Generations software to create this “Hope” card. One thing I really must mention is that I’ve been watching Holly and Larry Pike’s videos over at You Can Digitize and they have really supplemented the training videos that I received from Generations with my software. If you are looking for digitizing lessons with Generations, Holly is an excellent teacher. Another thing is her voice is easy to listen to. Even though I don’t know her, she and her husband Larry seem like genuinely nice people who I someday hope to meet.
I stitched the design out as an applique onto gold felt. Then I layered yellow felt on top and then stitched the lettering. It is all sitting on a gold glitter piece of cardstock and this will be used as a card. The recipient could use it as a bookmark. Around the outside of the design, rather than doing a typical applique satin stitch, I used a cross stitch. I waited until the design was completed and then just trimmed the felt close to the stitching. With felt, there is no need to worry about fabric raveling.
Other than first fixing my digitizing mistakes, the next item on my agenda is to figure out how to place the design here as a free download for all of you. I’m open to suggestions if you would like to contact me.
With hugs and blessings,
Nancy
ps. I’m recovering well from my hernia surgery that I had last Friday. I’m up and around more today. Going through surgery of course is no fun, but it literally forced me to stay off my feet for a few days. I had my laptop right next to me and got to go through the You Can Digitize videos while recuperating. What a fun way to spend my days in bed.
Dear Friends,
I’ve been like a child waiting for Christmas for my software to arrive. I was fortunate to get the end of the year bundle from Generations. So in addition to my software, I received a thread spool stand, thread rack, 30 spools of Robinson Anton thread, additional cd’s with classes, a ton of stabilizer and some stabilizer wraps which are the yellow things you see in the picture. The wraps are like those snap bracelets and they say things like “Tear Away” to go around the tear away stabilizer. The instruction manual is the three ring binder you see and it is huge. I’ve been diving right into it.
One thing I discovered before purchasing is that Generations software is sold through a number of distributors. Each of those distributors had added to the software package with their own special bundle. Be sure to shop around to get the best deal from the distributor you are most comfortable with.
Tomorrow I am getting a one-on-one orientation class about the software. I can’t tell you how excited I am to be jumping in with both feet and learning how to do this.
I have been doing a lot of research on embroidery software. When I say a lot, I mean I’ve been looking at the different brands and attending an occasional class for just over a year as I decided which was the best brand for me. I’ve made the plunge! I decided on the Generations Embroidery Software.
Let me back up a bit here. I’ve fallen in love with machine embroidery. It is the best thing since sliced bread I tell ya. As I have continued with it, more and more I have toyed around with the idea of creating my own designs. I hesitated though for so long. One reason I hesitated was the cost. Another was the learning curve and besides there are so many great designs out there already. Yet, I strongly desire to create my own designs. I have ideas floating around in my head I just want to stitch out.
I found a very limited free program that at least gave me the ability to add lettering to my projects and it gave me a taste of designing. All that did was whet my appetite for learning more.
I knew though, that whatever software I decided on I would need to have support. The classes I took at my local sewing shop had brought in an outside instructor from their software company. I wouldn’t find support at my local shop. I needed to look online. I asked in my various sewing/embroidery groups that I belong. Everyone had an opinion and everyone seemed to be happy with what they had chosen. How was I to ever decide?
A number of software manufactures have tutorials up on YouTube. I started watching those to see if I would find one that would speak to me as being relatively easy to learn and something that I could produce high quality designs with. I’m sorry to say, but some embroidery designs leave a lot to be desired and I would have hated having wasted good money on them. (that is another blog post) If I’m going to design something, I want to be proud of it.
I discovered Generations software and people were raving that it was very user-friendly. Intuitive is another word often used. There is plenty of support out there for Generations software both from the company and from other online classes.
After much decision making, I have decided to take the plunge. Are you ready to jump in with me and follow my journey here? My software is being shipped and I’m excited to receive it. I’ll give you an update about it as soon as I can.Oh and one more reason I’m doing this…I’m facing the empty nest syndrome. I know I will be needing something for “ME” soon. Actually I need it now! Our oldest, Katie, left last May and entered into the Air Force. Emily leaves next year for college. Finally our youngest, Timothy, is currently a sophomore in high school. They are not my “little” babies any longer. I know I need something to really keep my mind focused on and learning something new and challenging myself is it. Even with still having two at home, being that they are teenagers, they honestly aren’t at home very much with work and school. I’ve got to tell you, I LOVE it when their friends are all here and the house is full of kids who I can cook for and love on.
I’ve been working on some sweet hand towels to give as Christmas gifts. I am bundling one candy cane towel with one Santa sled. I think they turned out sweet as can be.
The towels are from Costco. The designs are from Anita Goodesign. I used metallic silver thread for the top and white for the bobbin and just as with the Thanksgiving towels, I hooped water-soluble stabilizer in the hoop, floated the towel on top and topped the towel again with water-soluble stabilizer to keep the stitches up and showing.
I think these are the perfect Christmas gift for many on my list.
With love and Christmas Blessings,
Nancy


.jpg)

.jpg)